Progress Report #5
Over four months have passed since the last progress report. During that period, I invested a lot of time into cleaning up the current codebase, improving performance and adding some nice features. Unfortunately, there were no notable fixes to broken games so please don't expect nice screenshots with before/after comparisons.
State-Dependent Dispatching
The first thing I want to talk about is something I call "state-dependent dispatching", even though "dispatching" is probably the wrong technical term to use in this situation. Emulators must handle lots of hardware states simultaneously to function correctly. Most of them can be changed by writing to an I/O register or even during the execution of a single instruction. Examples of such states in the GBA are:
- Which mode is the processor in?
- Is the CPU halted until the next interrupt?
- Has an interrupt been requested?
- Are timers running?
- Is DMA active?
That amounts to five invariants that need to be checked before, while or after every executed instruction. The old CPU implementation used a nested if-else chain to evaluate each state and act accordingly. That sounds quite reasonable until you realize that this is the hot path we are talking about. Now it is time for me to present to you the innermost CPU loop, the pit of hell and profilers' worst nightmare:
void ARM::execute() {
  if (dma) {
    // Run DMA
  } else {
    if (halted) {
      if (timers) {
        // Run timers until interrupt
      } else {
        // Set cycles to zero
      }
      return;
    } else {
      if (interrupted) {
        // Handle interrupt
      } else {
        if (thumb) {
          // Execute Thumb instruction
        } else {
          // Execute ARM instruction
        }
      }
    }
  }
  if (timers) {
    // Run timers
  }
}
It looks much worse than it actually is, but you get the idea. Lots of different states require lots of if-else statements. The result is code with many branches, something a modern CPU doesn't like. Emulators are known for their bad branch prediction because the branches don't tend to follow a predictable pattern. Adding more branches to each instruction just aggravates this problem.
So how can we get around this massive if-else chain and transform it into something faster? Well, most of these states change rather infrequently and don't require constant re-evaluation. Therefore the easiest thing to do is to store the current emulator state in a variable and then call a dispatch function made for that specific state until it changes. That reduces the number of branches to almost zero and their runtime overhead to a minimum.
class ARM {
  enum State {
    kStateThumb = 1 << 0,  // Processor mode
    kStateHalt  = 1 << 1,
    kStateIrq   = 1 << 2,
    kStateDma   = 1 << 3,
    kStateTimer = 1 << 4
  };
  uint state;
}
I'll explain "state-dependent dispatching" for the processor mode. There exists a specific bx instruction, speak "branch and exchange", that allows the processor to change its mode. If the lowest bit in the target address is set, the processor changes its mode to Thumb. Otherwise, it remains in ARM mode. The example given below changes the state variable when switching from ARM to Thumb mode. If we want to change back from Thumb to ARM mode, we need to clear this flag again.
if (cpsr.t = addr & 0x1) {
  // Change processor state to thumb
  state |= kStateThumb;
} else {
  // No state change
}
Actions similar to this need to be done at all places that relate to states defined in the State enum. Once we have a functional state variable in place, we can start thinking about writing a dispatch function that considers the state. The five different states require 32 unique dispatch functions to be defined (the number of plausible combinations is lower). Here we can use C++'s templates to create an optimized dispatch function for each state case without writing more than one function. The current implementation looks like this.
template<uint state>
void ARM::dispatch() {
  while (cycles > 0 && this->state == state) {
    if (state & kStateThumb) {
      // Execute Thumb instruction
    } else {
      // Execute ARM instruction
    }
  }
}
The state & kStateThumb part of the function will be evaluated at compile-time and has no runtime cost. All that's left to do is call the correct dispatch function for the current state. Each dispatch function runs as long as the state remains the same and there are processor cycles to go through.
void ARM::run(int cycles) {
  this->cycles += cycles;

  while (cycles > 0) {
    switch (state) {
      case 0: dispatch<0>(); break;
      case 1: dispatch<1>(); break;
      case 2: dispatch<2>(); break;
      // ...
    }
  }
}
What would a performance post be without comparing numbers? I originally intended this one to be about multiple improvements, but I decided to focus on the most important thing. GPR class removal and instruction template LUTs aren't nearly as interesting and impactful as "state-dependent dispatching". The second one has also been discussed in a previous progress report. Now take a step back and look at these wonderful results:
| Commit | Improvement | Pokémon Emerald | Yoshi's Island |
|---|---|---|---|
| 368955c0 | Baseline | 432.1 fps | 455.0 fps |
| 7007ab8a | GPR class removed | 460.8 fps | 481.7 fps |
| fc00b845 | Instruction template LUTs | 489.4 fps | 511.7 fps |
| a3a8fca2 | Basic state dispatching | 522.8 fps | 542.1 fps |
| 326b4809 | Improved state dispatching | 556.9 fps | 574.4 fps |
Efficient Bit Iteration
The block data transfer instructions of the ARM7 encode the transferred registers in a binary register list (rlist). Each set bit in this list represents a register that needs to be transferred during execution. Take 0b0111 for example, which will transfer registers one to three but not register four.
Emulating these instructions requires iterating all bits in the rlist and transferring set ones. The code below shows a simple (and naive) example of doing it. In each iteration, we shift the bits in the rlist to the right and increase the current bit index x by one. We do this until the rlist equals zero, which means that there are no more bits left to transfer. Inside the loop, we check if the lowest bit is set and then use the bit index to transfer the correct register.
uint rlist = 0b1010'0110'1110'1010;
for (uint x = 0; rlist != 0; ++x, rlist >>= 1) {
  if (rlist & 0x1) {
    // Transfer register
  }
}
While this version is more than enough for its use case, it doesn't feel like the end-all and be-all of efficient bit iteration. It lacks in two important areas, which are branch prediction and iteration count. The if-statement will cause the host CPU's branch predictor to fail half of the time on average because emulation is inherently random. The high iteration count is caused by the fact that we iterate all bits instead of only the set ones that we need.
uint rlist = 0b1010'0110'1110'1010;
for (; rlist != 0; rlist &= rlist - 1) {
  uint x = bits::ctz(rlist);
  // Transfer register
}
The optimized version might be confusing to people without a deeper understanding of bit operations. It starts with the same rlist as the naive variant and then uses ctz to count the trailing zeros (the ones on the right side), which happen to be equal to the index of the lowest set bit. ctz can be represented by a single processor instruction on most architectures, like BSF on x86, and is very efficient. The loop expression rlist &= rlist - 1 clears the lowest set bit after each iteration.
This combination allows efficient and branchless bit iteration, at least if you ignore the loop itself. The whole thing can also be wrapped into C++ language constructs like a custom iterator and a range-based for loop to make it look more appealing.
for (uint x : bits::iter(rlist)) {
  // Transfer register
}
In the end, this whole section could also be titled "premature optimization". Implementing efficient bit iteration had a minuscule performance impact on two of many processor instructions, and the overall performance impact was barely, if at all, noticeable. However, it was fun to think about.
Emscripten
At some point during the last months, porting the emulator to WebAssembly crossed my mind and hooked me for some days. Reading through the emscripten documentation made me realize that there wasn't much left to do to port an SDL2-based application to WebAssembly. I had to remove some platform-specific code, which is always a good thing, and add a modified main function. Compiling isn't much different compared to Linux and macOS, which were working fine already.
The included filesystem API is a nice abstraction around the fact that browsers don't have access to the filesystem without special permission from the user. It allows placing data in a buffer and then accessing it like a normal file from within the C++ code.
function loadFile(input) {
  const reader = new FileReader();
  reader.onload = () => {
    const data = new Uint8Array(reader.result);
    FS.writeFile('rom.gba', data);
  };
  reader.readAsArrayBuffer(input.files[0]);
}
All of this sounds nice great to have to figure out errors. The whole thing can be quite infuriating because debugging isn't an option, and emscripten tends to throw cryptic error messages at you. I had to go through all commits to find the one that broke the emulator. It turned out to be the filesystem's canonical function, which requires a file to exist. Otherwise, it throws an error.
The result can be tested here.
Improving Tests
The last part of this progress report is dedicated to my GBA test suite. I developed most of it simultaneously with the eggvance CPU to ensure correctness. The whole thing is writing is pure assembly to have the maximum control over it. That was especially important during the start when most instructions weren't implemented yet. At some point, I moved the test suite into a separate repository because it became its own project.
Since then, it has resulted in some CPU edge-case fixes in mGBA and other open-source emulators. These poor developers had to work with a test suite that was meant for personal use. It had no user interface at all and stored the number of the first failed test in a register. The only graphical things about it were a green screen on success and a red screen on failure. That's why I decided to add a minimal user interface.
u8 glpyh[8] = {
  0b00111100,  // ⬜⬜⬛⬛⬛⬛⬜⬜
  0b01100110,  // ⬜⬛⬛⬜⬜⬛⬛⬜
  0b01110110,  // ⬜⬛⬛⬜⬛⬛⬛⬜
  0b01111110,  // ⬜⬛⬛⬛⬛⬛⬛⬜
  0b01101110,  // ⬜⬛⬛⬛⬜⬛⬛⬜
  0b01100110,  // ⬜⬛⬛⬜⬜⬛⬛⬜
  0b00111100,  // ⬜⬜⬛⬛⬛⬛⬜⬜
  0b00000000   // ⬜⬜⬜⬜⬜⬜⬜⬜
};
The most important problem to solve was rendering text in assembly, which turned out to be much easier than expected. First, I extracted a simple font from tonclib, where each text glyph is encoded in eight bytes like in the example shown above. Then I wrote an algorithm to render the text itself. It uses the GBA's bitmap background mode and moves each bit in the glyph data into a byte in video memory. That's it. All text rendering functions were done in merely 71 lines of code. These already include setting up certain registers and colors as well as positioning the text.
text_glyph_data:
        ; r0:   data, modified
        ; r1:   pointer, modified
        stmfd   sp!, {r2-r4, lr}        ; Function prologue
        mov     r2, 0                   ; Loop counter
.loop:
        and     r3, r0, 1               ; First bit
        lsr     r0, 1                   ; Advance in data
        and     r4, r0, 1               ; Second bit
        lsr     r0, 1                   ; Advance in data
        orr     r3, r4, ror 24          ; Move second bit
        strh    r3, [r1], 2             ; Write data, advance pointer
        add     r2, 2                   ; Advance loop counter
        tst     r2, 7                   ; Check for glyph line end
        addeq   r1, 232                 ; Move to next line
        cmp     r2, 32                  ; Check for loop end
        bne     .loop                   ; Loop or exit
        ldmfd   sp!, {r2-r4, pc}        ; Function epilogue
With all text rendering functions in place, I was able to add a simple user interface. It shows whether or not the test suite succeeded and also adds the number of the first failed test if there was one. That should make it much easier for developers to use the test suite. Of course, you still have to refer to the actual source code to understand what the test did, but that shouldn't be a problem for the target audience.
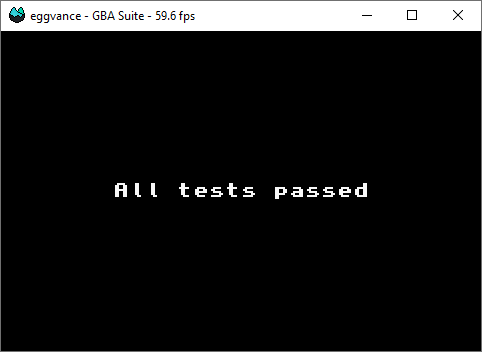
Test suite passed 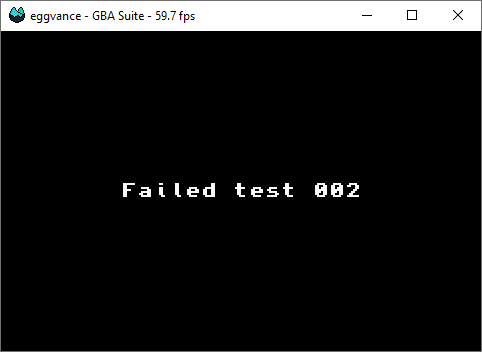
Test suite failed
Final Words
This whole thing took me much longer than expected. I committed the first draft of the performance table in mid-February and am now finishing the article in early June. Formulating text and walking other people through ideas has never been a strength of mine.
Anyway, I hope to finish most of the cleanup sometime soon and then write another progress report once I'm ready to release version 0.2. I want it to be as stable and accurate as possible before I devote time to implementing more advanced things like audio emulation and CPU prefetching.